

How To Remove Otterbox Iphone 6 Plus
Updated date:
How to Put On and Remove OtterBox Defender for iPhone 6, iPhone 6 Plus, iPhone 6S, and iPhone 6S Plus
Max holds a B.S. in mass communications from SIU, an M.A. in communications from U of I, and is pursuing an MBA from Webster University.
Introduction
While the OtterBox Defender case for the iPhone 6, iPhone 6 Plus, iPhone 6S, or iPhone 6S Plus can be a bit bulky, it's a great way to keep your expensive device from getting damaged. As a result, it can also increase the value of your device when you sell it or trade it in when you're done with it. The OtterBox Defender offers two layers of protection for your iPhone: a hard plastic shell that includes a screen protector, and a rubber shell that wraps around the hard plastic shell that helps absorb the shock when the device hits a hard surface. Putting on and removing an OtterBox Defender case from your iPhone 6, iPhone 6 Plus, iPhone 6S, or iPhone 6S Plus can be tricky the first time you try doing it. The only tool required is a flat-head screwdriver, and plan on the process taking a couple of minutes.
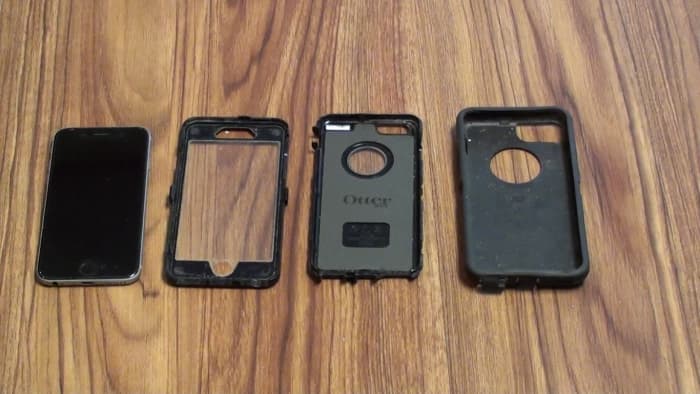
The three pieces of the OtterBox Defender case setting next to an iPhone 6.
Max Dalton
How to Remove OtterBox Defender
- Slide your finger between the rubber shell that covers the outer edges and the back of the iPhone, and the hard plastic shell that encloses your device. Slide your finger around your iPhone to separate the rubber shell from the hard plastic shell. If you can't work your finger into that area, you may want to slide a butter knife in between the two layers to separate them.
- Remove the outer rubber shell from the hard plastic case that encloses your iPhone.
- Look at the back of the hard plastic case protecting your iPhone 6, iPhone 6 Plus, iPhone 6S, or iPhone 6S Plus. You'll see seven arrows on the back, pointing to the seven clips connecting the two pieces of the hard plastic case together. There are three clips along the left edge of the case, three clips along the right edge of the case, and one clip along the top edge of the case.
- Start with one of the clips at the bottom of one of the edges. Slide your fingernail or a flat-head screwdriver under the clip and then slowly pull the clip out just a little bit until you can get some separation between the two sides of the plastic case in that section. Be very careful to not break the clips. Work your way around the case to repeat this step with all of the clips. If you're having problems with a particular clip, move on to the next clip. It may take a few trips around the phone to get enough separation to remove the two pieces of the hard plastic case.
- With your hand under the back part of the hard plastic case, pull the top part of the hard plastic case off of your iPhone.
- Lift your iPhone out of the back part of the hard plastic case. You've successfully removed your iPhone 6 or 6S from the Otterbox Defender case.
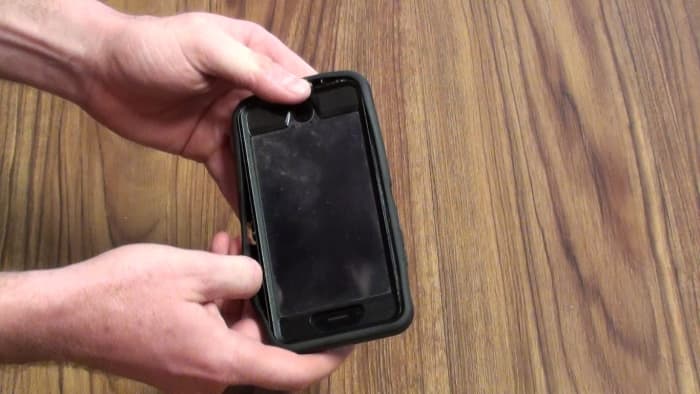
Slide your finger in the groove between the rubber outer shell and the hard plastic case inside of it. Work your finger around your iPhone to separate the out rubber shell, and then remove the rubber shell.
Should I Update My Apple iPhone or iPad iOS Version?
How to Put On OtterBox Defender
- Seat the iPhone inside of the half of the hard plastic case the covers the back part of your iPhone.
- Line the front part of the hard plastic case up over your phone so that the hole in the top center of the front plastic case goes directly over the front-facing camera and the speaker for phone calls, and the hole for the home button at the bottom of the front plastic case goes directly over the home button.
- Work your way around the iPhone 6, iPhone 6 Plus, iPhone 6S, or iPhone 6S Plus to each of the points where a clip is located, and then press to clip the front and back hard plastic pieces together at each of those seven points.
- Slide the bottom of the iPhone into the front, bottom part of the Otterbox Defender rubber shell.
- Push the top part of the iPhone underneath the top part of the rubber shell.
- Working your way around the outside of the rubber shell, gently squeeze the outside of the OtterBox Defender's rubber shell to secure it against the hard plastic case. You'll also need to push in the rubber covers for the vibrate switch, the Lightning port, and the 3.5mm headphone jack. You've now successfully put the OtterBox Defender case on your iPhone 6, iPhone 6 Plus, iPhone 6S, or iPhone 6S Plus.
© 2017 Max Dalton
Related Articles
How To Remove Otterbox Iphone 6 Plus
Source: https://discover.hubpages.com/technology/How-to-Put-On-and-Remove-OtterBox-Defender-for-iPhone-6-iPhone-6-Plus-iPhone-6S-and-iPhone-6S-Plus
Posted by: winshipforre1939.blogspot.com
0 Response to "How To Remove Otterbox Iphone 6 Plus"
Post a Comment